General Setting
After the installation of the plugin has been completed, you can change the configuration settings in the Confluence Administration by accessing the Configure button in the Add-ons menu, or by accessing it in the menu bar on the left hand side of the screen.
The whole Confluence Space can be exported to a new Confluence instance, maintaining all related information specific to the Space.
Global Configuration
Parameter | Description |
|---|---|
Special Groups | Specify which group(s) has the permission to unlock a page after it's been locked. To add a special group, start typing the first letters of the group you would like to add in the given input field. A dropdown list will appear with a list of group names to choose from (starting with the first letters you typed). Choose the desired group you would like to add, then click on the "Add" button. |
Special User | Specify which user(s) has the permission to unlock a page after it's been locked. To add a special user, start typing the first letters of the user you would like to add in the given input field. A dropdown list will appear with a list of user names to choose from (starting with the first letters you typed). Choose the desired user you would like to add, then click on the "Add" button. |
Added Templates | Set a predefined template to style your history table. |
How to configure the History Macro table template
To add a new History table template, you need to define the name of the template in the given input field, then click on the Add button.
If you would like to remove a specific template, click on the Delete button.
Click on the Edit button next to the History table template if you would like to change the details of the specific template. The History Macro Template Editor will appear.
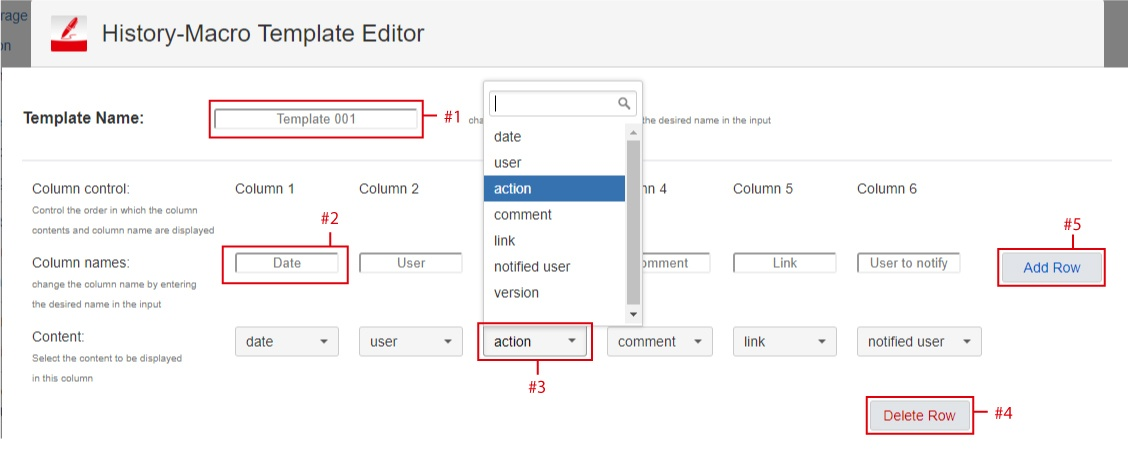
You will be able to edit the following fields in the History Macro Template Editor
#1: Change the name of your History Macro table template.
#2: Change the column name by entering the desired name in the input field. The table consists of 7 columns by default.
#3: From the dropdown list, choose which content should be displayed in which column.
#4: Click on the Delete Row button to delete a column, or
#5: Click on the Add Row button to add a column. A maximum of 7 columns and a minimum of 1 column is allowed.